9 Small Kitchen Decor Ideas That Maximize Space
Small kitchens don’t fail because they’re tiny. They fail because they’re treated like they have the same layout needs as a big kitchen, which is honestly a hilarious lie we all tell ourselves.
Space is only a problem when the storage, decor, and daily habits aren’t working together.
The good news is you don’t need to remodel anything or spend a fortune to make a small kitchen feel bigger.
You just need to decorate smarter, and sometimes that means choosing function over “cute” for a few decisions.
I’ve tried a lot of small kitchen fixes over the years, and I can tell you this confidently: a small kitchen can feel clean, stylish, and even kind of luxurious if you stop fighting the space and start using it like it’s a tool.
1. Add a Slim Rolling Cart That Works Like a Mini Pantry
Small kitchens usually have one big problem: there’s never a good “in-between” spot for things you use constantly.
You end up stacking stuff on the counter because it’s annoying to keep putting it away, and then suddenly your kitchen looks like a clutter museum. A slim rolling cart solves that by giving you a movable storage zone that doesn’t eat up floor space.
I love these carts because they create a fake pantry in kitchens that don’t have one. You can store snacks, spices, oils, small appliances, or even dish towels without turning your cabinets into a disaster.
Plus, when guests come over, you can roll it out of sight like you’re hiding evidence.
This idea also works great if you rent, because it’s zero commitment. No drilling, no remodeling, no regret.
Why This Works
A rolling cart gives you vertical storage without needing a permanent built-in cabinet. It also helps you separate “daily use” items from “occasional use” items, which is huge in a small kitchen.
The best part is the flexibility. When your kitchen layout feels cramped, being able to move storage around makes the room feel less boxed in.
How to Do It
- Measure the gap beside your fridge, stove, or counter before buying anything
- Choose a cart with at least two shelves and a top surface
- Use the top shelf for items you grab daily like oil, salt, and cooking tools
- Use the bottom shelf for bulk items like rice, snacks, or cleaning supplies
- Add small bins to keep categories separate and stop the “everything pile” effect
Style & Design Tips
Go for a cart that matches your hardware finishes if possible. If your kitchen has black handles, pick a cart with black metal framing to keep it cohesive.
Avoid carts with bulky sides or thick frames because they look heavy in small spaces. Also, don’t overload the top shelf with random bottles unless you want it to look like a chaotic bar setup.
Pro Tip or Budget Hack
If you want it to look expensive, line the shelves with removable vinyl or a neutral shelf liner. It instantly makes the cart feel styled instead of “I bought this for storage because I’m desperate.”
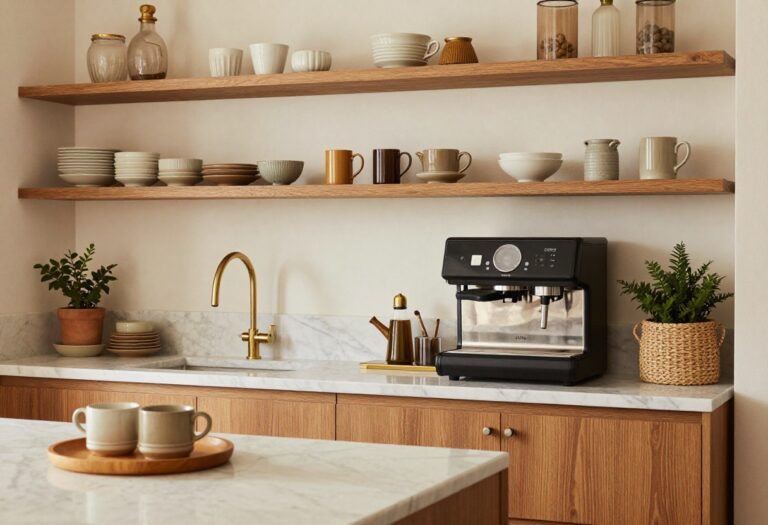
2. Use Floating Shelves Instead of Upper Cabinets (Or Mix Both)
Upper cabinets can make a small kitchen feel like it’s closing in on you. They’re useful, sure, but they can also make the space look heavier and darker. Floating shelves are one of the easiest ways to open up the visual space while still keeping storage.
I used to think floating shelves were only for Pinterest-perfect kitchens where nobody actually cooks. Then I tried them in a small space, and I realized they’re honestly amazing when you use them properly. The trick is keeping them functional and not turning them into a “random decor shelf.”
You don’t even have to remove all cabinets. Sometimes replacing just one section makes the whole kitchen feel bigger.
Why This Works
Floating shelves reduce visual weight. Cabinets create solid blocks, but shelves feel airy, which gives the illusion of space.
They also force you to organize better. When you can see everything, you stop hoarding ugly mismatched mugs like they’re collectibles.
How to Do It
- Pick one wall section to start, ideally near the sink or stove
- Install 2 shelves stacked vertically with enough space between them
- Store daily dishes like plates and bowls on the bottom shelf
- Put glasses, mugs, or pantry jars on the top shelf
- Use brackets if you want a farmhouse look, or hidden mounts for modern style
Style & Design Tips
Keep your shelf items within a color theme. If your dishes are all different colors, the shelf can start looking messy fast, even if it’s technically organized.
Also, don’t overcrowd them. Negative space matters here, and it makes your kitchen look calmer. Use matching jars and neutral plates if possible, and avoid tossing random decor pieces everywhere.
Pro Tip or Budget Hack
If you can’t afford real wood shelves, buy thick MDF boards and stain them yourself. It looks nearly identical once installed, and nobody’s going to walk into your kitchen and test the wood grain like a detective.
3. Hang a Rail System for Utensils, Mugs, and Mini Baskets
Drawer space disappears fast in small kitchens. You have utensils, spatulas, ladles, measuring cups, and somehow 14 wooden spoons you don’t remember buying. A wall-mounted rail system gives those tools a home without sacrificing cabinet space.
This is one of my favorite small kitchen tricks because it makes the kitchen feel more like a workspace and less like a storage closet. It also keeps your most-used tools right where you need them, which makes cooking feel smoother.
The only danger is hanging too much stuff and creating visual clutter. You want it to feel organized, not like a flea market display.
Why This Works
Rails use vertical wall space, which is often wasted. They also keep frequently used items accessible, reducing the need for overstuffed drawers.
Functionally, this improves your workflow. You can grab what you need without opening cabinets and shifting things around.
How to Do It
- Choose a wall area near your stove or prep space
- Install a metal rail with hooks (usually 18–30 inches long)
- Hang utensils you use daily like spatulas and tongs
- Add small hanging baskets for garlic, tea bags, or spice packets
- Hang 2–4 mugs if you drink coffee daily
Style & Design Tips
Pick a rail finish that matches your faucet or cabinet hardware. A brushed gold rail in a kitchen full of chrome can look random unless you intentionally repeat gold accents elsewhere.
Avoid hanging too many bright plastic utensils. If possible, use matching metal or wooden tools so the rail looks like decor, not just storage.
Pro Tip or Budget Hack
Use S-hooks from the hardware store instead of fancy branded hooks. They’re cheaper, stronger, and honestly work better.
4. Create a “Corner Command Zone” With a Tiered Corner Shelf
Kitchen corners are basically where clutter goes to die. You get a dead space on the counter where nothing fits properly, and then suddenly it becomes a messy pile of spices, oils, and maybe a random protein powder tub. A tiered corner shelf fixes that by stacking storage upward while keeping it neat.
This is one of those small decor upgrades that looks simple but makes the kitchen feel instantly more organized. It also helps your counter feel larger because it concentrates items into one intentional zone.
I’ve used these for spices, coffee supplies, and even dish soap setups, and they always make the space feel more “designed.”
Why This Works
Corners are awkward, but they’re valuable. A tiered shelf makes the corner usable without taking up the whole counter.
It also reduces visual clutter by grouping similar items together. Instead of everything spreading across the counter, it becomes a tidy display.
How to Do It
- Pick one corner near your main prep area
- Buy a tiered shelf with 2 or 3 levels
- Put your most-used items on the lowest tier
- Use the upper tiers for spices, sauces, or coffee syrups
- Keep the setup limited to one theme (coffee zone or cooking zone)
Style & Design Tips
Choose a shelf with clean lines. Wire shelves can look cheap unless they’re styled well, while bamboo or wood shelves usually look warmer.
Don’t mix too many label styles. If you’re using jars, use matching labels so the whole corner looks intentional instead of random.
Pro Tip or Budget Hack
If you already have a lazy Susan, stack it on top of a small cutting board or wooden tray. It gives the same tiered effect without buying anything new.
5. Use Matching Containers and Labels to Make Open Storage Look Clean
Open storage is tricky in small kitchens. It’s useful, but it can also make your space look chaotic if everything is mismatched. The fastest way to make a small kitchen feel expensive and organized is using matching containers for pantry staples.
I’m not saying you need to become one of those people who stores flour in a glass jar like it’s a museum exhibit. But if you transfer a few key items into matching containers, your kitchen immediately looks calmer.
This is especially helpful if you store things on shelves or in visible cabinets.
Why This Works
Matching containers reduce visual noise. Even if you have the same amount of stuff, it looks cleaner when it’s uniform.
It also improves function. You can see what you have, measure quickly, and stop buying duplicates because you forgot you already had three bags of rice.
How to Do It
- Pick 5–10 pantry items you use constantly (rice, pasta, flour, sugar, snacks)
- Buy matching containers in the same style and size family
- Use simple labels in one font and one color
- Store them together in one cabinet or on one shelf
- Keep extras like half-empty bags out of sight
Style & Design Tips
Clear containers look modern and make the kitchen feel lighter. Matte white containers look sleek but hide contents, which can be annoying.
Avoid using too many label colors. If you want a clean look, stick with black text on white labels or minimalist clear labels.
Pro Tip or Budget Hack
You can reuse pasta sauce jars or pickle jars if you clean them properly. Add uniform labels and suddenly your “free jars” look like designer storage.
6. Install Under-Cabinet Lighting to Make the Kitchen Feel Bigger
If your kitchen feels cramped, there’s a good chance the lighting is doing you dirty. Small kitchens often have one sad overhead light that makes the whole room look flat and shadowy. Under-cabinet lighting changes the entire vibe, and it also makes your workspace more functional.
This is one of those upgrades that feels fancy, but it’s surprisingly easy to do. Stick-on LED strips have gotten so good that you can make your kitchen look custom without hiring anyone.
I did this in a rental once, and it made the space feel like a totally different kitchen.
Why This Works
Lighting creates depth. When your counters are lit separately from the ceiling, the kitchen feels larger and more layered.
It also highlights clean surfaces and makes everything look sharper. Even a basic kitchen looks upgraded with good lighting.
How to Do It
- Buy warm white LED strips or puck lights
- Clean the underside of your cabinets before sticking anything
- Install lights toward the front edge for better coverage
- Hide cords behind appliances or use battery-powered options
- Test brightness before fully attaching everything
Style & Design Tips
Avoid super cool white lighting unless you want your kitchen to feel like a hospital break room. Warm white is softer and more flattering.
Also, don’t choose lights that are too bright. You want a glow, not an interrogation lamp.
Pro Tip or Budget Hack
Use motion-sensor LED strips inside cabinets too. It makes your storage feel high-end, and it’s ridiculously helpful at night.
7. Add a Decorative Cutting Board Stack and Make It Useful
This one sounds almost too simple, but it works. A cutting board stack on the counter adds warmth and style, and it also serves a real purpose. Small kitchens need decor that doubles as function, and cutting boards are basically perfect for that.
I used to leave my cutting boards shoved in a cabinet where they were hard to grab. Once I started stacking them upright in a corner, I realized it made cooking easier and the kitchen looked more styled.
The key is picking boards that actually look nice together.
Why This Works
Cutting boards bring texture into a kitchen. Wood tones soften hard surfaces like granite, tile, or stainless steel.
They also act like vertical decor. Instead of cluttering the counter with random accessories, you get a simple layered look.
How to Do It
- Choose 2–4 cutting boards in different sizes
- Pick wood tones that complement your kitchen colors
- Stack them upright against the backsplash
- Add a small tray underneath if you want it contained
- Use them regularly so it doesn’t become “fake decor”
Style & Design Tips
Mix shapes slightly, like one rectangular board and one round board. It creates a layered look without feeling messy.
Avoid super scratched-up boards if they’re in full view. A little wear is fine, but if it looks like it survived a war, maybe retire it.
Pro Tip or Budget Hack
Thrift stores often have solid wood cutting boards for cheap. Sand them lightly and oil them, and they look brand new.
8. Use a Large Wall Mirror or Reflective Decor to Fake More Space
Small kitchens can feel tight because the walls close in visually. A mirror might sound like something you’d put in a hallway, but in a kitchen, it can actually make the space feel bigger. You don’t need a huge dramatic mirror either, just something placed strategically.
I’ve seen mirrors work beautifully in tiny kitchens, especially when they reflect a window or a bright area. It makes the kitchen feel like it has more depth, and it adds a little “designer” vibe without trying too hard.
It’s basically a cheat code for making the room feel less boxed in.
Why This Works
Mirrors bounce light and create the illusion of extended space. Even a narrow kitchen can feel wider if the eye sees reflection.
Reflective surfaces also add contrast. A kitchen full of matte textures can feel flat, so adding shine gives balance.
How to Do It
- Choose a mirror with a simple frame or no frame
- Hang it on an empty wall, ideally across from a window
- Keep it above counter height so it stays clean
- Use strong mounting hooks for safety
- Clean it regularly because kitchen mirrors collect grease fast
Style & Design Tips
A black frame looks modern, a gold frame looks chic, and a wood frame feels cozy. Match the mirror frame to your cabinet hardware if possible.
Avoid ornate frames unless your kitchen is already traditional. Too much detail can make the space feel busy.
Pro Tip or Budget Hack
Instead of a mirror, use a glossy backsplash panel behind the stove area. It reflects light and still feels practical.
9. Create a “No-Clutter Counter Rule” With One Decorative Tray Zone
Counters get messy fast, especially in small kitchens where every surface becomes storage. The best way to fix that isn’t just “clean more,” because nobody wants to do that daily. The smarter solution is creating one designated counter zone where clutter is allowed, but controlled.
A decorative tray becomes your kitchen’s “landing pad” for daily essentials like salt, oil, a candle, or a small plant. Everything else stays off the counter. It sounds simple, but it’s shockingly effective.
I’ve used this trick in tiny apartments, and it basically stops your kitchen from spiraling into chaos.
Why This Works
A tray gives clutter boundaries. It tells your brain, “This is where stuff goes,” and everything else feels out of place.
It also creates a styled focal point. Instead of random objects scattered everywhere, you get one intentional arrangement that makes the kitchen look curated.
How to Do It
- Pick one counter corner or small section near the stove
- Choose a tray that fits the space (round or rectangular)
- Place 3–5 useful items inside like oil, salt, pepper, and a small jar
- Keep the rest of the counter clear
- Reset the tray once a week so it doesn’t turn into junk storage
Style & Design Tips
Stick with a tray material that matches your kitchen vibe. Wood feels warm, marble feels elegant, metal feels modern.
Don’t overdecorate the tray. A tray stuffed with random knickknacks defeats the whole point, and it starts looking cluttered again.
Use one small decorative item like a mini vase or plant, but keep it simple.
Pro Tip or Budget Hack
Use a basic baking sheet as a tray and cover it with peel-and-stick marble vinyl. It sounds a little ridiculous, but it looks shockingly good when done neatly.
Final Thoughts
Small kitchens don’t need bigger square footage, they need better decisions. If you focus on vertical storage, controlled counter space, and decor that actually earns its place, your kitchen will instantly feel calmer and more functional.
Start with one upgrade instead of trying to do everything at once. Once you see how much better the space feels, you’ll get addicted to fixing little problem areas, and honestly, that’s the best kind of home decor obsession.