9 Bathroom Remodel Ideas for Small Spaces
Small bathrooms don’t forgive bad decisions. One oversized vanity, one awkward cabinet door, or one poorly placed towel bar, and suddenly the whole room feels like it’s working against you.
The good news is you don’t need a huge renovation budget to make a tiny bathroom feel smarter, cleaner, and honestly kind of impressive. You just need the right upgrades in the right spots.
These are the remodel ideas that actually make a difference in real life, not just in those staged “no one lives here” Pinterest bathrooms.
1. Swap the Vanity for a Floating One
Most small bathrooms feel cramped because the vanity eats up visual space and blocks the floor. Even if the vanity isn’t technically huge, it still makes the room feel heavy, like the bathroom is wearing boots two sizes too big. A floating vanity fixes that instantly because it opens up the floor area and makes everything feel lighter.
I used to think floating vanities were only for modern, expensive bathrooms, but honestly they work in almost any style if you choose the right finish. Plus, they make cleaning easier because you’re not fighting around cabinet corners and base trim.
This remodel idea is especially good if your bathroom feels narrow or if the vanity sits right next to the toilet and everything feels squished.
Why This Works
A floating vanity gives the illusion of more square footage because you can see the floor underneath it. Your eyes register open space, which makes the room feel bigger even though the actual size didn’t change.
It also makes the bathroom feel less cluttered because bulky vanities visually dominate a small room. When the vanity looks lighter, the entire bathroom suddenly feels less chaotic.
How to Do It
- Measure your current vanity width and depth so you don’t accidentally buy something oversized
- Choose a floating vanity that’s slightly narrower if the walkway feels tight
- Install blocking in the wall if needed so the vanity has solid support
- Mount the vanity at a height that feels comfortable, usually 32–34 inches
- Add a slim backsplash to protect the wall and make it look finished
The blocking step matters because floating vanities need real strength behind them, not just drywall anchors. If you skip that part, you’ll always feel nervous leaning on the sink.
Style & Design Tips
Pick a vanity with clean lines if your bathroom already feels busy. If your tiles have lots of pattern, don’t add a vanity with heavy wood grain or fancy drawer fronts.
A mistake people make is choosing a floating vanity that looks too “thin” and cheap. Go for something with a solid front panel and decent hardware because flimsy vanities scream budget remodel in the worst way.
Pro Tip or Budget Hack
If a floating vanity feels too expensive, you can cheat by using a wall-mounted IKEA cabinet system with a countertop on top. It takes a little planning, but the result looks surprisingly custom for the price.
Also, leave a little space under the vanity for a small basket if you want storage without clutter.
2. Replace the Swing Door with a Sliding or Pocket Door
Bathroom doors are sneaky space killers. A regular swing door steals usable floor space and creates awkward dead zones where nothing fits. In a small bathroom, that can be the difference between feeling comfortable and feeling like you’re doing yoga just to get to the sink.
A pocket door is the dream solution, but even a sliding barn-style door can work if the wall space allows it. I’m not always a barn door fan, but in tiny bathrooms, I will absolutely forgive it if it solves a real problem.
This remodel makes the bathroom easier to move around in, especially if it’s shared or connected to a bedroom.
Why This Works
Removing the swing radius gives you more layout flexibility. Suddenly you can place a towel hook, a shelf, or even a slim storage cabinet where the door used to crash into everything.
It also makes the bathroom feel less cramped because you’re not constantly stepping around the door like it’s an annoying roommate.
How to Do It
- Check if the wall next to the door is clear enough for a pocket door cavity
- If pocket doors aren’t possible, measure for a sliding door track instead
- Choose a door style that matches your bathroom vibe
- Install a soft-close track if you want it to feel higher-end
- Patch and repaint around the frame so it looks like a real remodel
Pocket doors require more work because the wall has to be opened. Sliding doors are easier but need solid mounting and a door that doesn’t wobble.
Style & Design Tips
If your bathroom is modern, go with a flat panel door and a sleek track. If it’s farmhouse or cozy, you can get away with a warmer wood tone.
Avoid doors with big gaps around the edges unless you enjoy broadcasting every bathroom sound to your entire household. Some sliding doors look cute but offer zero privacy, which is… not ideal.
Pro Tip or Budget Hack
If you can’t install a pocket door, you can still gain space by switching your current door to swing outward instead of inward. It’s not as fancy, but it’s a cheap fix that helps immediately.
Also, use a narrow door pull instead of a chunky handle so it doesn’t snag towels or clothing.
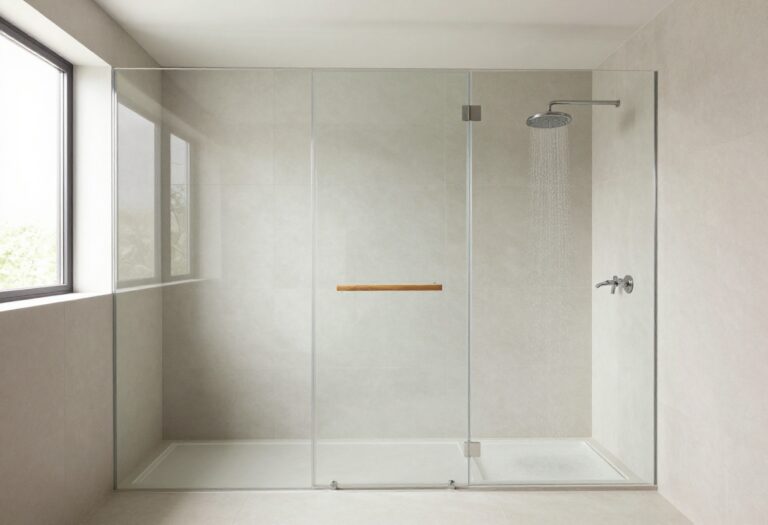
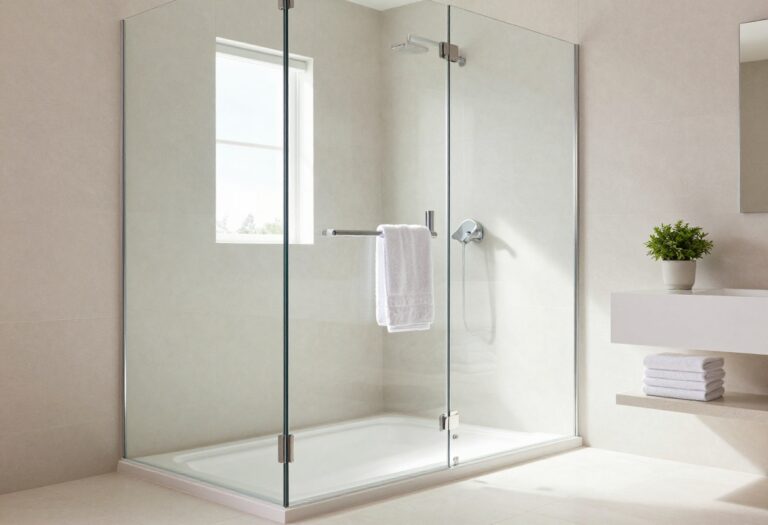
3. Install a Walk-In Shower with a Clear Glass Panel
Small bathrooms often look smaller because shower curtains chop up the room visually. Even if your tub is clean and your curtain is cute, the bathroom still feels divided into weird little sections. A walk-in shower with a clear glass panel fixes that because it keeps the room visually open.
I used to think glass showers were high-maintenance, but honestly, they’re manageable if you pick the right coating and squeegee once in a while. Plus, the payoff is huge because the bathroom suddenly looks twice as expensive.
This is one of those upgrades that changes the whole vibe without adding square footage.
Why This Works
Clear glass creates uninterrupted sightlines. Your eyes can see the full depth of the room, which makes the bathroom feel larger and less boxed in.
A walk-in shower also removes bulky framing, which reduces visual clutter and makes the design feel cleaner and more modern.
How to Do It
- Decide whether you want a full glass enclosure or just a fixed panel
- Choose a low-profile shower base or tiled floor for a seamless look
- Install waterproofing properly before tiling anything
- Use large-format tile to reduce grout lines
- Add a recessed niche for shampoo storage
The waterproofing step is where people mess up and regret everything later. If you’re doing a remodel, do it right because water damage is not the fun kind of surprise.
Style & Design Tips
Use light-colored tile if your bathroom is tiny. Dark tile can look dramatic, but in small spaces it often feels like the shower is closing in on you.
Also, avoid busy mosaic floors unless you love cleaning grout. A sleek shower looks best when the materials feel calm and intentional.
Pro Tip or Budget Hack
If a full walk-in shower is too expensive, you can still upgrade your tub-shower combo by replacing the curtain with a clear glass door. It’s a smaller change but gives a similar “open” effect.
Look for frameless or semi-frameless doors because heavy metal frames can make the space feel cramped again.
4. Use Large Mirrors to Fake More Space
Tiny bathrooms have one job: don’t feel tiny. And mirrors are basically the cheat code for that. A big mirror reflects light, doubles visual depth, and makes the bathroom feel way more open without changing the layout at all.
I’ve seen people hang these sad little mirrors that barely cover the sink width, and it always makes the bathroom feel unfinished. A larger mirror instantly makes the space look more intentional and upgraded.
This remodel idea is also affordable compared to most bathroom changes, which makes it even better.
Why This Works
Mirrors create the illusion of depth. They reflect both light and surrounding surfaces, making the room feel wider and brighter.
A large mirror also reduces visual clutter because it acts like one clean design element instead of multiple small ones fighting for attention.
How to Do It
- Measure the vanity width and aim for a mirror that matches or slightly exceeds it
- Choose a mirror height that feels balanced with your ceiling height
- Mount the mirror so it sits a few inches above the faucet line
- Use proper anchors if it’s heavy
- Consider adding sconces instead of overhead lighting
Mounting it correctly matters because if the mirror is too high, it looks awkward and feels impractical when you’re actually using it.
Style & Design Tips
If your bathroom feels modern, go with a frameless mirror or a thin black frame. If it’s more traditional, a thicker frame can add warmth.
One common mistake is choosing a mirror with a trendy shape that doesn’t fit the space. Rounded mirrors are cute, but if you need maximum reflection, rectangular wins.
Pro Tip or Budget Hack
Instead of buying one huge mirror, you can install two identical mirrors side-by-side for a custom look. It feels fancy but often costs less than one oversized piece.
Also, check local marketplaces because people sell high-quality mirrors cheap when they remodel.
5. Build Recessed Storage Between Wall Studs
Small bathrooms always struggle with storage, and bulky cabinets make the room feel tighter. Recessed storage is a smart fix because it adds storage without stealing floor space. It’s basically the only kind of bathroom storage that doesn’t feel annoying.
I love recessed niches because they look custom, even if you build them yourself. And once you have one, you’ll wonder why every bathroom isn’t built with these by default.
This works great behind the toilet, near the shower, or even next to the vanity.
Why This Works
Recessed shelves use wall cavity space that normally goes wasted. Since the shelves sit flush with the wall, the bathroom stays visually clean and open.
It also makes the bathroom feel more high-end because built-in features always look intentional and “planned,” even if you added them later.
How to Do It
- Locate studs using a stud finder and confirm spacing
- Choose a section of wall without plumbing or electrical wires
- Cut drywall carefully and frame the opening with wood supports
- Install shelves or a recessed cabinet insert
- Finish with trim, paint, or tile for a polished look
The key is to keep the recessed area aligned and symmetrical. Crooked shelves will make the whole remodel look DIY in the bad way.
Style & Design Tips
Paint recessed shelving the same color as the wall if you want a seamless look. If you want it to pop, use a contrasting paint color or wallpaper backing.
Avoid cluttering it with random bottles. Stick to matching containers, baskets, or neatly arranged towels so it looks like design, not storage panic.
Pro Tip or Budget Hack
Instead of building a full recessed cabinet, you can install a recessed medicine cabinet above the sink. It’s one of the easiest ways to gain storage without changing the layout.
If you want a custom look, swap the cabinet mirror with a framed one.
6. Upgrade Lighting with Slim Wall Sconces
Bad lighting makes a small bathroom feel smaller and more depressing, and nobody wants that. Most builder-grade bathrooms have one harsh overhead light that makes everyone look tired and the walls look yellow. A better lighting setup instantly makes the space feel more expensive.
Slim wall sconces are perfect because they add style without taking up room. Plus, they provide more flattering light for getting ready, which is honestly a big deal.
This remodel idea feels fancy but doesn’t have to be complicated.
Why This Works
Sconces spread light evenly across the face and room, reducing shadows. That makes the bathroom feel brighter, cleaner, and larger.
They also add vertical interest, which helps small bathrooms feel taller and less boxy.
How to Do It
- Decide if you want sconces on both sides of the mirror or above it
- Choose slim fixtures that don’t stick out too far
- Install electrical wiring safely or hire an electrician
- Use warm white bulbs for a natural glow
- Add a dimmer switch for flexibility
A dimmer is the secret weapon because you can have bright light for cleaning and softer light for nighttime without changing fixtures.
Style & Design Tips
If your bathroom is modern, go with matte black or brushed nickel sconces. If it’s more vintage, brass looks amazing when done right.
Avoid fixtures that are too ornate in a small space. In tiny bathrooms, simple shapes usually look more expensive than fussy designs.
Pro Tip or Budget Hack
If wiring sconces feels like too much work, install plug-in sconces and hide the cord with a cord cover painted the wall color. It’s not perfect, but it looks surprisingly good if done neatly.
Also, swapping your bulbs to high-quality LED can improve the whole bathroom even before you change fixtures.
7. Replace the Toilet with a Compact or Wall-Hung Model
Toilets are not cute. They’re not meant to be cute. But in a small bathroom, a bulky toilet becomes the main character whether you like it or not. Switching to a compact toilet can make the room feel more open and less crowded.
Wall-hung toilets are the ultimate space-saver, but even a shorter-depth toilet can help a lot. I’ve seen bathrooms where a compact toilet upgrade alone made the room feel less like a closet.
This remodel is especially useful in narrow bathrooms where the toilet sticks out too far.
Why This Works
Compact toilets reduce how far the fixture projects into the room. That creates more walking space and makes the layout feel less cramped.
Wall-hung toilets also expose more floor area, which visually expands the room and makes cleaning easier.
How to Do It
- Measure your current toilet projection from wall to front edge
- Look for “compact depth” toilet models
- Check rough-in size to ensure compatibility
- Replace the toilet carefully or hire a plumber
- Upgrade to a soft-close seat for a nicer feel
The rough-in measurement is important because toilets aren’t one-size-fits-all. If you skip that, you’ll buy a toilet that doesn’t fit and you’ll be furious.
Style & Design Tips
Choose a toilet with a sleek tank shape if you want a modern look. Rounded, bulky tanks tend to feel dated and visually heavy.
If you go wall-hung, make sure the wall finish is clean and polished because that style highlights everything.
Pro Tip or Budget Hack
If you don’t want to replace the toilet, consider replacing the tank lid with a flat tray-style top. Some brands sell them, and it gives you a little surface for décor without adding clutter.
Also, installing a slim toilet paper holder can help the whole toilet area feel less crowded.
8. Add Vertical Storage with Over-the-Toilet Built-Ins
The space above the toilet is usually wasted or filled with a sad wire rack from 2007. But in a small bathroom, that wall area is prime real estate. Built-in shelving or a cabinet above the toilet can give you storage without stealing any floor space.
I’ve done this in a tiny guest bath and it instantly made the room feel more organized. It also makes the bathroom feel taller because your eyes move upward instead of focusing on how narrow the room is.
This remodel idea is practical, simple, and makes the bathroom feel more finished.
Why This Works
Vertical storage takes advantage of unused wall space, which is critical in small rooms. It also keeps essentials accessible without cluttering the vanity or floor.
Built-ins look intentional, which makes the bathroom feel more expensive than it actually is.
How to Do It
- Measure the wall width above the toilet and height to the ceiling
- Decide if you want open shelves, closed cabinets, or a mix
- Install sturdy supports anchored into studs
- Keep shelf depth shallow so it doesn’t feel bulky
- Style the shelves with a balance of storage and décor
Shallow depth matters because deep shelves above the toilet can feel heavy and awkward, like the bathroom is wearing a backpack.
Style & Design Tips
Use matching baskets for toiletries so the shelves look organized, not chaotic. Keep colors neutral if your bathroom is small, because too many bold items can make it feel cluttered.
Avoid putting too many tiny decorative items. One plant and a couple folded towels looks styled, but five little jars looks like a craft store exploded.
Pro Tip or Budget Hack
If built-ins feel too permanent, use floating shelves with decorative brackets. They give you storage and style without the full remodel effort.
You can also paint the shelves the same color as the wall for a built-in effect on a budget.
9. Use Light, Continuous Flooring to Visually Stretch the Room
Flooring is one of the most underrated bathroom remodel choices, especially in small spaces. If the floor has harsh patterns, dark tones, or busy tile, the bathroom instantly feels smaller. Light flooring with a clean pattern can make the room feel wider and calmer.
I’m a big fan of continuous flooring that flows smoothly without too many visual breaks. It gives the bathroom that “clean slate” feeling, which is exactly what small bathrooms need.
This remodel idea works even if you don’t change anything else, because flooring affects the entire room’s visual weight.
Why This Works
Light flooring reflects more light and reduces the “boxed in” feeling. When the floor feels open, the whole room feels larger.
Using larger tiles or continuous vinyl planks also reduces grout lines, which means less visual clutter and a more seamless look.
How to Do It
- Choose light neutral flooring like soft beige, warm gray, or pale stone
- Pick large-format tile or waterproof vinyl planks for fewer breaks
- Use a grout color close to the tile color for a smooth look
- Install flooring first before adding baseboards or trim
- Seal grout properly if using tile
Matching grout is the trick people forget. Dark grout might look trendy, but in a small bathroom it makes the floor look like graph paper.
Style & Design Tips
If your bathroom already has busy walls or patterned shower tile, keep the floor simple. If your walls are plain, you can add a little texture with subtle stone-look tile.
Avoid tiny mosaic floors unless you enjoy scrubbing grout with a toothbrush. In small bathrooms, simple always wins.
Pro Tip or Budget Hack
Luxury vinyl tile (LVT) is a great budget-friendly option because it’s waterproof, easy to install, and looks surprisingly realistic now. Some of the new plank styles genuinely look like real wood or stone.
If you want a designer look, run the flooring in the same direction as the longest wall to visually stretch the space.
Final Thoughts
Small bathrooms don’t need more square footage, they need smarter choices. When you focus on layout, lighting, storage, and visual flow, the whole room starts working with you instead of against you.
If you only pick one upgrade, go for something that opens up space visually, like a floating vanity or clear glass shower. Once the room feels less cramped, everything else becomes easier to style.
And trust me, nothing feels better than walking into a tiny bathroom that somehow looks like it belongs in a high-end remodel show.